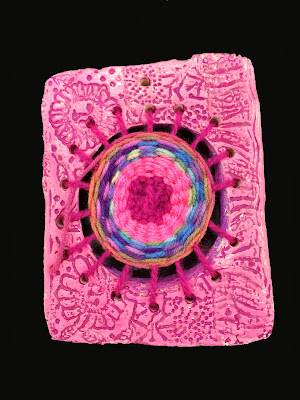
I'm brave, I tried a new lesson again.... I can say as we are completing these clay frames that you have to follow some basic rules or you will have broken frames. We have had only 3, but I did make extras.
My 4th graders tackled this lesson with stoneware clay, and finished them with oil pastels, one color of watercolor paint and I painted modge podge on them when dry.
The texture is the key part of the coloring process! I have rollers and rubber texture mats.
At least pencil think and more than 2 fingers in width.
You need some lid tracers and a pin tool. Don't try to cookie cutter it.
I strongly recommend 15 or 19 holes punched with a straw. You must have an odd number!!
If they go hole craze, pop out the clay from the straw and plug the holes.
I found the directions for weaving the warp threads here on Cassie Stephen's blog.
I am also doing her plate weaving at the same time with 2nd grade.
This is how I loaded them to prevent them from snapping and breaking. I also loaded them leather hard and they didn't break since they were not as fragile.
In the second class period they colored their frames on folded newspaper to prevent them from banging them on the desks. Use oil pastes or construction paper crayons, followed by very watered down prang watercolor paint. (one color was my rule)
In the third class, I had the kids number the wholes and I precut yarn.
Yes, this is the most confusing part, but we did it in one class period.
After you finish the warps, use the odd number thread from the front to begin weaving in the center. I recommend trying it yourself a few times, before teaching it.
Here are a few that are almost finished. I found some really nice textured yarns at Joann's.
I am planning to display these for open house in March.
I have decided to have a circle themed art display this year.


These look fabulous!! I'm doing regular weaving using hand-made clay looms with my 4th graders and I'm having the hardest time with their looms falling apart as I get them into the kiln. There's quite a few that are way too thin. Yours look great, I didn't even think of using the oil pastels and paint I was just going to have them use glaze, but now I'm thinking I may do what you did because the colors look so bright
ReplyDeleteI have done a rectangle in the middle in the past, but think the circle is stronger. I highly recommend this way of coloring them. That way the glaze won't fill the holes. Good luck!
DeleteThese are really beautiful. I am intrigued by the way you loaded them into the kiln. I would never have thought to stand them up. Terrific project.
ReplyDeleteThanks! They break if you stack them horizontal! I learned that the hard way😳!
DeleteThese are fantastic! I would love to try this with my students, but I have a question about firing the clay. You said you loaded the kiln when the frames were leather hard. Did you then let them finish drying out in the kiln or did you preheat first and then start a slow bisque firing cycle?
ReplyDeleteYes I did! I put them in before Thanksgiving break and fired when we returned the following week. Thank you!
DeleteWow! These are absolutely gorgeous. Definitely a must do!! ANNDD pinning onto my Pinterest board now! :)
ReplyDeleteThank you! Good luck.
Deletethese are great, Beth! Question- 4 class sessions? 5?
ReplyDeleteDo you think this could be done with air dry clay? I wonder if the clay would break during the weaving.
ReplyDeleteno, I tried this many years ago and they broke, too fragile. Sorry
DeleteI re read! At least 5 class sessions.
ReplyDeleteI love these...so much, in fact, that my fifth graders made the looms today. I have had amazing luck with another process. We use craypas and then paint with slightly thinned tempera. Once it is dried, you wash and the tempera stains any bare clay. A bit more of an artifact sort of feel.
ReplyDeleteAre the rollers specifically a clay item? What is the metal rectangular tool in one of the photos? Is it for creating slabs?
ReplyDeleteThank you : ) these are beautiful!
These aRe beautiful! The rollers...are they specifically a clay item? What is the metal rectangular tool? Does that create slabs?
ReplyDeleteThank you.
The metal tool is a slab slicer. The texture rollers came from Sax. Thanks!
DeleteStacking in the kiln on end was something I never thought of and I am doing tiles. I take it you have had no problems with breakage this way. How thick are the frames?
ReplyDeletedo you think is possible without a kiln? I have class but no kiln to use and want to bring clay into the class room.
ReplyDeleteI wouldn't use air dry clay.
DeleteCould you explain the beginning of the weaving process? I've never done anything like this but Love the look. Not sure where to start with the yarn process. Thanks!
ReplyDeleteIt is just a basic abab circle weaving process. Many Youtubes available.
DeleteDid you spray the piece with anything after the watercolor dried? I'm just wondering if the oil pastel smeared at all. I've only used glaze on fired clay before. Beautiful project.
ReplyDeleteI painted with Modpodge
DeleteHi Beth,
ReplyDeleteI noticed that you used tape to hold the end of the warp strings in place. Do you leave the tape on or do you tie it off somehow?
Hey-how do these get shiny after the oil pastels and watercolors? Did you coat them with something?
ReplyDeleteoops-just the question and answer above, sorry!!
ReplyDeleteBeth - this is just wonderful! Can I put this on www.creativity4wellbeing.com? I will attribute it to you of course. My e-mail is creativity4wellbeing'gmail.com. Thank you. Richard x
ReplyDeleteYes , thank you.
Delete