
Remember the Aluminum Alamo?


I created this lesson many years ago after having difficulties with a clay Alamo lesson in my curriculum.  I had to use air dry clay, since I had no kiln, and many projects fell apart. Sad teacher and kids! ..... I was flipping through an Arts and Activities magazine (pre pinterest) later in the school year, and found a lesson on Metal Tooling. I recalled an aluminum Alamo plaque I purchased while visiting San Antonio. Light bulb moment........my Alamo lesson. 


On Day 1, we discussed the Alamo and the missions they had preciously learned about in their Socials Studies class. I picked up from there and we discussed architecture of the past and present in Texas. They created a contour drawing of the facade on manila paper cut the same size as the 32 gauged aluminum. I encouraged them to make it their own interpretations. 

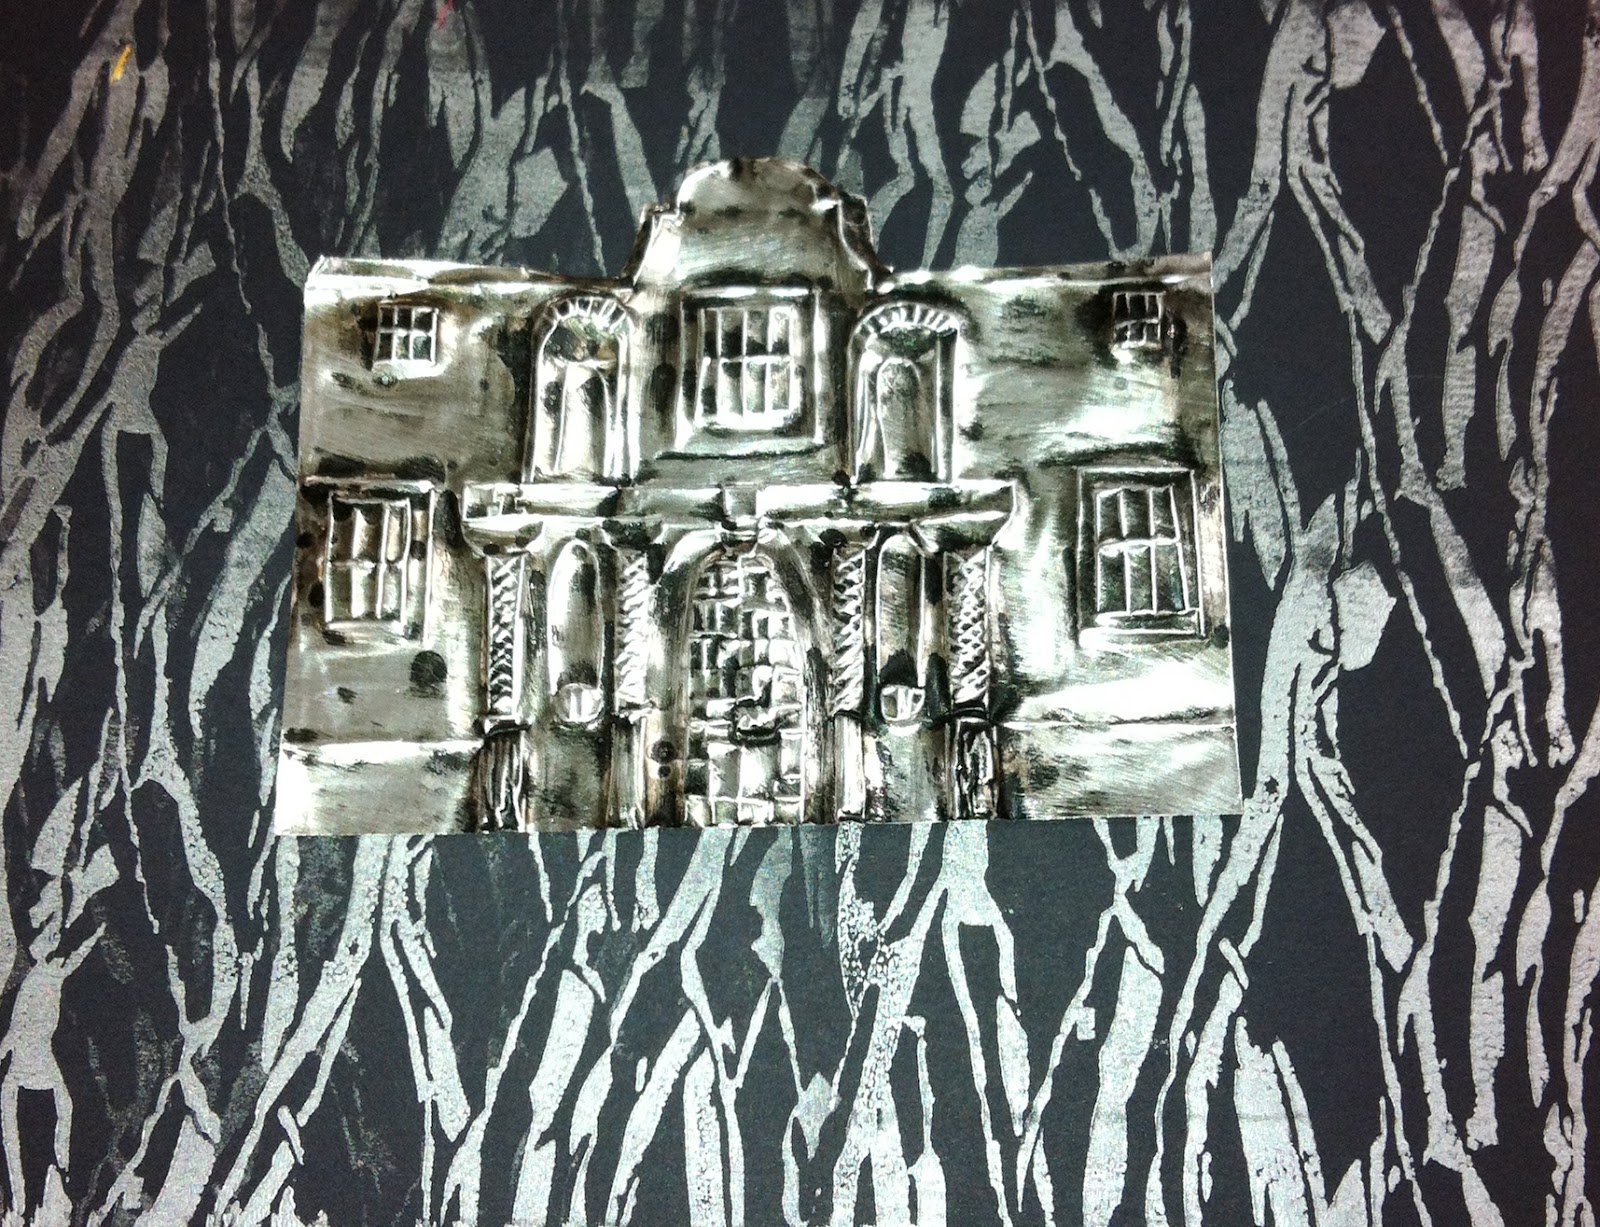
On Day 2 we taped the drawing to the aluminum and discussed metal tooling. We used ball point pins to transfer the design into the aluminum with felt underneath. The second step was to retrace the lines with dull pencils or a wooden stylus. 


Day 3 involved more metal tooling. Since the Alamo is a symmetrical structure we could flip over the aluminum and continue creating the relief sculpture with reprousse techniques. I tried to cut the tops off of the Alamo to create facade shape before classed ended. We also painted the "front" surface with India ink and soap to age the metal and create contrast. 


Day 4 was the finishing day this week. I had the students use still wool to polish the "hills" of the raised relief texture of the aluminum. They printed a background paper using Fiskar brayers and silver Dick Blick ink. I hot glued the Alamo Relief sculptures and we are finished!


Comments

  1. Beautiful! This architecture is perfect for using with metal tooling foil. Thanks for sharing!

    ReplyDelete

Post a Comment

Thank you for visiting and leaving a comment. Beth

Most popular post

Kandinsky Trees

My first graders really need help with their fine motor skills this year. After completing a very successful Kandinsky Concentric Circle painting lesson noted below, I followed up this past week with a tree inspired lesson. Once again, I found my inspiration from  Jen Draw the Line At  and I used her lesson suggestions for this very successful lesson. My student's used Crayola Metallic crayons instead of the Crayola Construction paper crayons and we used juice lids for some bigger circles in the stamping part of the lesson.  Day 1 On day two constructed the trees and circle leaves. I passed out a 12 x 4 inch piece of black paper and had two different sizes of  square paper for the circles. Yes, this was a challenge since we did not use pencil, but we drew with our scissors. Day 2 I will definite repeat lesson for next year! I will be displaying these soon.  Displayed artwork is posted  HERE

Monet's Pond

The Dallas Museum of Art  has a wonderful   Monet Painting  in a beautiful gold frame which inspired me to create this lesson for our Big Art Day which is fast approaching in Texas schools.  For our Big Art day this year I have a Theme....Circle Art!  Themes are the way to go when organizing events.  I love this new lesson that was inspired by one of my favorite artists,  and two favorite bloggers:  Painted Paper and Cassie Stephen's who also use themes.  I ordered the 10 inch cardboard circle rounds for this lesson, the same size  Cassie used in her Dot Day Art .  School Specialty has various sizes. The kids loved painting on this canvas instead of paper.  We read about Monet's garden and look at prints of his masterpieces. I even show them some of my pictures that I took when I   visited his garden in France.   On day one, we painted the pond and the water lily pond on a 10 inch cardboard circle  on the white side with Pr

Clay and Weaving!

I'm brave, I tried a new lesson again.... I can say as we are completing these clay frames that you have to follow some basic rules or you will have broken frames. We have had only 3, but I did make extras.  My 4th graders tackled this lesson with stoneware clay, and finished them with oil pastels, one color of watercolor paint and I painted modge podge on them when dry.   The texture is the key part of the coloring process! I have rollers and rubber texture mats.  At least pencil think and more than 2 fingers in width.  You need some lid tracers and a pin tool. Don't try to cookie cutter it.  I strongly recommend 15 or 19 holes punched with a straw. You must have an odd number!! If they go hole craze, pop out the clay from the straw and plug the holes.  I found the directions for weaving the warp threads here on Cassie Stephen's blog.   I am also doing her plate weaving at the same time with 2nd grade.  This is ho